BioPatent
Communications
Lost Wax Casting of Jewelry and Statues
by Gary Baker, Esq. Patent Attorney
 Manufacturing silver jewelry
and art objects is satisfying. I can exercise a variety of skills and everyone
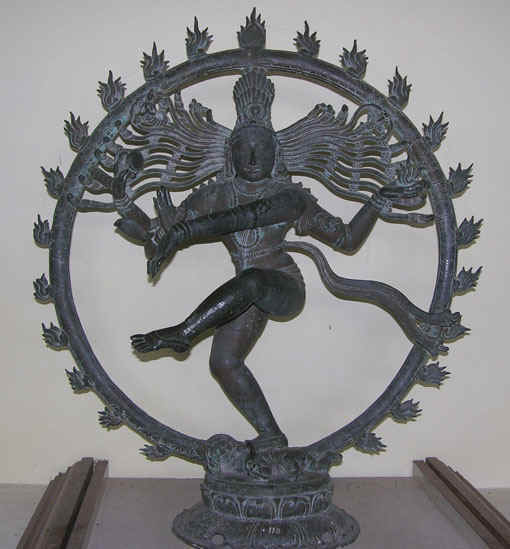
recognizes the value, if not the art, of the final product. To make a silver statue,
one must sketch a design in multiple perspectives, fabricate a wax model original, produce
a mold, caste molten silver into the mold, polish and assemble the object. The
result is a permanent expression of art with the gleam and romance of the most reflective
precious metal. I also find the weight, rapid heat conductivity and smooth contours
of silver statuettes can fascinate the sense of touch. Manufacturing silver jewelry
and art objects is satisfying. I can exercise a variety of skills and everyone
recognizes the value, if not the art, of the final product. To make a silver statue,
one must sketch a design in multiple perspectives, fabricate a wax model original, produce
a mold, caste molten silver into the mold, polish and assemble the object. The
result is a permanent expression of art with the gleam and romance of the most reflective
precious metal. I also find the weight, rapid heat conductivity and smooth contours
of silver statuettes can fascinate the sense of touch.
I was inspired to become a silver worker after I spent a day having a
craftsman in Nepal fabricate a traditional silver ring. We sat on the dirt floor of
his small shop where he used simple tools to assemble the appliqué ring starting from a
bar of silver bullion. He flattened the silver bar into a sheet on an anvil with a
hammer. He sketched a flat band on the sheet silver and cut it out with a very fine
jeweler’s saw blade. The flat band was wrapped around a stick the size of my
finger, cut to size and the ends sealed together with silver solder. He didn’t
have a modern solder torch but a can of kerosene with a wick and a blow pipe attached.
A puff of his breath across the wick sent a yellow-orange reducing flame onto the
work piece to melt the solder. He fabricated a smaller silver band as a bezel mount
that could be pressed in to hold a star ruby. Small pieces of scrap silver were
melted like mercury into little liquid silver balls. The plain silver ring was
decorated with the bezel mount band and the silver balls. The craftsman used a small
artist’s paint brush to apply liquid silver solder flux between the ring and bezel
mount band/silver ball appliqués. Then he used the fine paint brush to carefully
place flux wetted slivers of silver solder to the base of the bezel mount band and each
silver ball. When he blew the soft orange flame across the object, the slivers of
silver solder liquefied and crept between the ring and bezel mount band/silver ball
appliqués. After cooling, the appliqués were permanently frozen to the silver
ring. He placed my cabochon cut star ruby into the bezel mount than pushed the upper
walls of the mounting band onto the ruby holding it fast. The ring was hand polished
to a high luster on a leather strap coated with jeweler’s rouge. In about four
hours, the Nepali jeweler had turned a bar of silver into a beautiful ring with only a
small set of simple tools. I thought, “I can learn to do that ... and I have
better tools at home.”
I constructed jewelry by the appliqué method for many years after I got
home. I quit hammering out my sheet stock on an anvil after I bought a rolling mill
machine with large steel rollers to do the work. I use a self lighting propane torch
and a soldering stage with metal fingers to hold the pieces together when I’m
soldering. But this is a discussion of Lost Wax Casting:
Lost wax casting is a method originally developed for dentists to make
gold and silver crowns. A wax original is covered with plaster (investment). A
mold is created when the wax is vaporized in a very hot oven leaving a hollow cavity the
shape of the wax original. The mold is injected with molten silver using a
centrifuge to force molten silver into every detail.
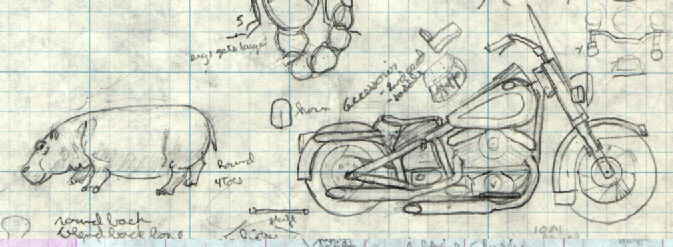
1) Design. Any three dimensional design can be cast in silver
using the centrifugal lost wax casting method. Wax originals can be formed free
hand. However, it is good practice to sketch the design to help imagine the scale
and detail of the project.
2) Wax Original. Wax is the ideal media for
sculpture. Wax can be purchased as sheet, square or wire stock for appliqué style
fabrication. Putty-like wax can be fashioned as a child makes Play-Do animals.
Wax can be melted and dripped precisely into place. Solid blocks of wax can
be carved as Michelangelo sculpted marble. I usually establish proper proportions
for an object in a wire and putty wax frame. I have a special tool called a wax pen
that applies melted wax from a fine tip at the push of a button. Details can be
scratched or burnished onto the wax surface. A quick touch of a flame will create a
glossy smooth surface.
3) Mounting and Investment. Several objects can be
mounted to be cast together on the same wax stock called a sprue. Many objects on a
sprue look like branches on a tree trunk. The sprue is planted in a rubber stage
that will act as the bottom of a container to hold
 liquid
investment when a steel cylinder is placed around the tree of sprue and objects. Dry
powder investment is mixed with water to a consistency like thick pancake batter and
poured over the sprue and objects inside the metal cylinder. The filled cylinder is
placed in a vacuum chamber and a vacuum pump turned on; the liquid investment boils as air
trapped in and on the wax objects is pulled off by the vacuum. The cylinder is
placed on a level surface for the investment to harden. liquid
investment when a steel cylinder is placed around the tree of sprue and objects. Dry
powder investment is mixed with water to a consistency like thick pancake batter and
poured over the sprue and objects inside the metal cylinder. The filled cylinder is
placed in a vacuum chamber and a vacuum pump turned on; the liquid investment boils as air
trapped in and on the wax objects is pulled off by the vacuum. The cylinder is
placed on a level surface for the investment to harden.
4) Bake Out. A mold is created in an oven when the wax and water
are vaporized from the hardened investment. The rubber stage is pulled off the steel
cylinder exposing the bottom of the wax sprue trunk. The cylinder with invested
sprue and objects is placed in an electric furnace and brought slowly to a temperature of
about 1500 degrees F. At first, large amounts of steam exit the furnace. The
wax melts and finally vaporizes as the furnace turns red hot. Residual wax and soot
are burned by small amounts of air coming into the yellow hot furnace. All that
remains is the baked out mold in a steel can.
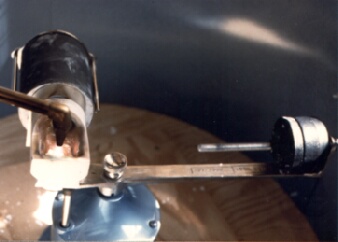 5) Casting. A crucible
sits on the arm of a spring powered centrifuge next to a cradle that will hold the baked
out mold at the end of the centrifuge arm. The required amount of silver, calculated
as a 12 times the weight of the wax sprue and objects, is placed into the crucible.
The silver is melted with an acetylene torch to cherry red liquid. The baked out
mold, at about 1000 degrees F, is immediately set onto the cradle at the end of the
centrifuge arm. My heart is pounding with anticipation of the critical moment.
I release the centrifuge and duck for cover. The centrifuge springs to action
throwing the molten silver from the crucible into the channel in the mold left by the wax
sprue trunk. Molten silver flows down into the cavities left by the wax objects
inside the mold. Some molten silver misses the mold, flies out of the centrifuge
enclosure, slips past the collar of my shirt and sizzles across my back. The
whirling centrifuge slowly comes to a stop. I toss the hot mold filled with silver
into a tub of water. The water boils violently as the investment shatters and
crumbles to release a silver replica of the wax sprue and original wax objects. 5) Casting. A crucible
sits on the arm of a spring powered centrifuge next to a cradle that will hold the baked
out mold at the end of the centrifuge arm. The required amount of silver, calculated
as a 12 times the weight of the wax sprue and objects, is placed into the crucible.
The silver is melted with an acetylene torch to cherry red liquid. The baked out
mold, at about 1000 degrees F, is immediately set onto the cradle at the end of the
centrifuge arm. My heart is pounding with anticipation of the critical moment.
I release the centrifuge and duck for cover. The centrifuge springs to action
throwing the molten silver from the crucible into the channel in the mold left by the wax
sprue trunk. Molten silver flows down into the cavities left by the wax objects
inside the mold. Some molten silver misses the mold, flies out of the centrifuge
enclosure, slips past the collar of my shirt and sizzles across my back. The
whirling centrifuge slowly comes to a stop. I toss the hot mold filled with silver
into a tub of water. The water boils violently as the investment shatters and
crumbles to release a silver replica of the wax sprue and original wax objects.
 6) Finishing. The
silver objects are cut from the silver sprue trunk with a jeweler’s saw. Rough
spots are filed away. I hate finishing. The objects are polished through a
never ending series of finer and finer abrasives - emery paper, finer emery paper, course
polishing compound on a buffing wheel, jeweler’s rouge, ultra fine compound.
The dust flies. A filtered respirator is required. I polish each object on the
buffing wheel until the it is too hot to hold in gloved hands. Crevices and delicate
details are polished on a leather shoe string coated with jeweler’s rouge.
Brighter and shinier. Finally, done. I love to sit back and admire the little
statues sitting on black velvet - a shining baby spoon, belt buckle or a gleaming
Harley-Davidson with turnable front forks. 6) Finishing. The
silver objects are cut from the silver sprue trunk with a jeweler’s saw. Rough
spots are filed away. I hate finishing. The objects are polished through a
never ending series of finer and finer abrasives - emery paper, finer emery paper, course
polishing compound on a buffing wheel, jeweler’s rouge, ultra fine compound.
The dust flies. A filtered respirator is required. I polish each object on the
buffing wheel until the it is too hot to hold in gloved hands. Crevices and delicate
details are polished on a leather shoe string coated with jeweler’s rouge.
Brighter and shinier. Finally, done. I love to sit back and admire the little
statues sitting on black velvet - a shining baby spoon, belt buckle or a gleaming
Harley-Davidson with turnable front forks.
 |